- Laser Engraving for Wood Turners (Part 5) – Todd Fipps
 … Continued from April 23, 2025 Engraving Non-Wood Materials: Expanding Your Creative Possibilities While wood is the most common material for laser engraving in woodturning, many other materials can be engraved with stunning results. Exploring acrylic, leather, metals, glass, and stone opens up a wide range of new design possibilities, from personalized keepsakes to artistic embellishments. However, ...
 - Laser Engraving for Wood Turners (Part 4) – Todd Fipps… Continued from April 9, 2025 Additional Considerations for Engraving Wood While the woods listed above provide excellent engraving results, keep these factors in mind to get the best outcome: Moisture Content – Always use dry, seasoned wood to prevent uneven burns, excess smoke, or warping. Grain Density – Fine-grained woods like maple engrave with more precision and clarity ...
- DemoitusBy Doug Miller We talk about demoitus from time to time. Often we misplace a tool or a piece of equipment doesn’t function as we expect. I’ve had those issues so many times. One thing we can never count on with no thought of miscue is the wood we are using. The saying goes something ...
- Camera Setup for filming or live demonstrationBy Jeff Walters There is this myth that if you want to do an online demo or make a YouTube video, that you need lots of expensive camera and computer gear. Well that is simply not true. Many of us that have done online demos for Worldwide Woodturners or for our respective clubs and groups have ...
- Avoiding Barrel Distortion in PhotographsIf you’ve ever been bothered by your camera changing the shape of a piece, you may be experiencing barrel distortion. Barrel distortion is caused by the shape of the camera lens, which compresses light waves in order to focus them on the image capturing plane. Below, I intentionally held the camera very close to the subject. ...
- Laser Engraving for Wood Turners ( Part 3 ) – Todd Fipps… Continued from March 26, 2025 Choosing Safe Materials for Engraving: Wood and Beyond Selecting the right material for laser engraving is just as important as choosing the correct machine settings. While wood is the most commonly used material for woodturners, laser engraving can also be applied to leather, acrylic, metal, glass, and more. However, ...
- Laser Engraving for Wood Turners (Part 2) – Todd Fipps… Continued from March 19, 2025 Newsletter Health and Safety Considerations: Engraving with Confidence and Caution While laser engraving is an incredible tool for adding intricate details and personalization to wood-turned projects, it’s important to recognize that you’re working with a powerful beam of focused energy— essentially controlled fire. That means safety should always be a ...
- Making Progress by Dane ChandlerIts always good to have perspective, not only for yourself, but to enable others to groBow in their turning journey. What I have here are a couple of examples of how I have improved my dyeing & finishing processes along with shape & form. Remember folks: Our Ego is not Our Amigo. ...
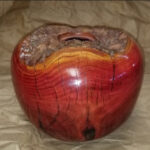
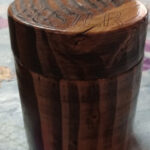
- What Makes an Urn by Brenda ThorntonMy name is Brenda Thornton, also known as Band Aid Brenda. This name was given to me by Capt. Eddie because, for quite awhile when I first began coming to Wednesday meetings, I had a band aid. After going to a woodworking symposium where I turned a pen, I’ve been turning about 5 yrs now. ...
- Making a Bear Paw Hollowform By David SwainStep 1 – I have it turned and hollowed, from 1/8” at the rim, to 3/16” at the bottom. I apply my sanding sealer usually 2 coats. Then I use Saral paper to apply the pattern. Step 2 – I use my tapered coarse Kutzall burr to rough out the openings. I take itvdown to within ...

Connecting Turners Across the Globe